Custom Domain for Aleph Cloud Instance
You can use Aleph Cloud Custom Domain Service to automatically handle a Domain Name for your instance.
It not only ensures that the domain name is automatically linked to the DNS of your running VM but also provide transparent routing of webtraffic on IPv4.
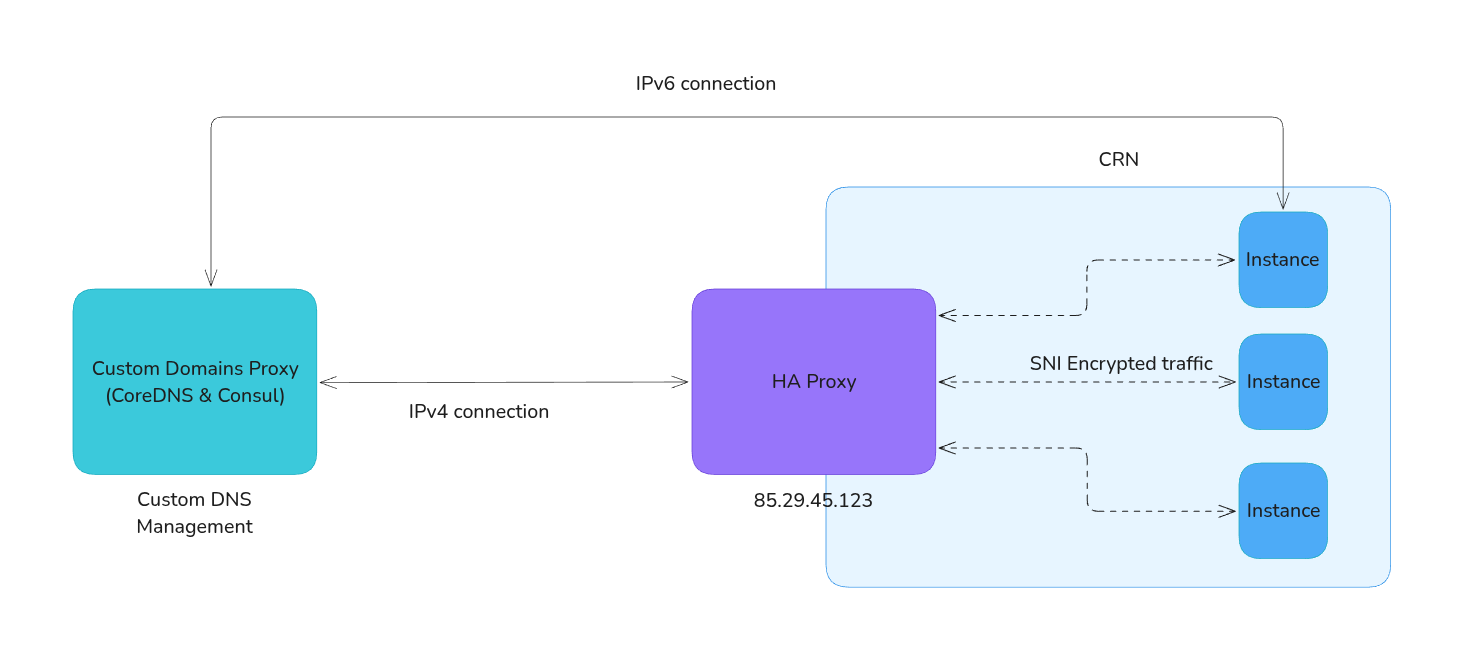
The Custom domain feature supports both IPv6 and IPv4, but they works in different way
On IPv6 the custom domain will map directly to the publicly assigned address
On IPv4, the instance receives no public address, thus the ip point to the hosting Compute Resource Node and can be used in two ways:
- For HTTP, HTTPS (port 80 and 443). Request get automatically redirected to your instance via HAProxy, making it seamless for your users to connect to web server running instance your instance.
- For other ports. We offer a port forwarding feature that allows routing port from inside your VM to a public port on the host. See
Configuration
Setting up a custom domain for your decentralized instance with Aleph Cloud can be achieved with just a few steps, either through the CLI or the Aleph Cloud Console or manually by updating the aggregate. All methods will require an initial manual DNS configuration.
Prerequisites
Before you start, make sure you have:
- Access to your domain's DNS settings.
- The Ethereum address you used to create the instance.
From the Aleph Cloud Console
A custom domain name can be set upon instance creation, inside the Advanced Configuration Options section
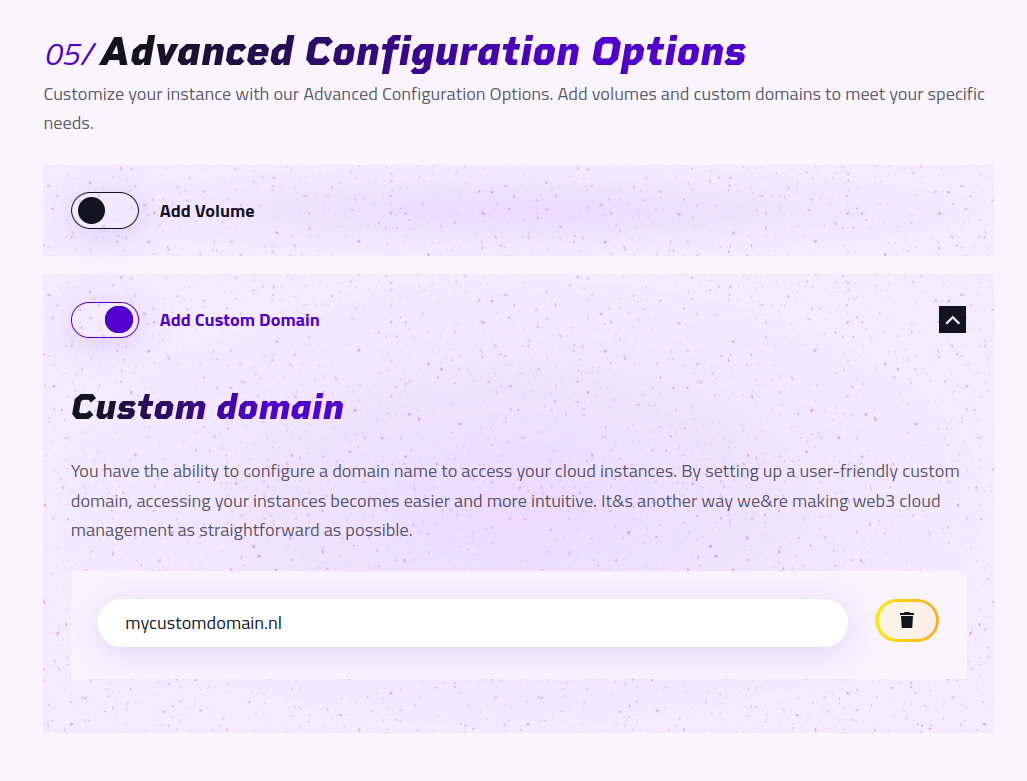
If you want to add a domain to an existing Instance, you can do so via the Settings -> Domains -> Create Custom domain. There you can enter your domain name, then in the Compute tab select your instance. The rest of the procedure is the same.
Then go to the detail page of your instances and follow the instruction on how to configure your DNS Zone properly.
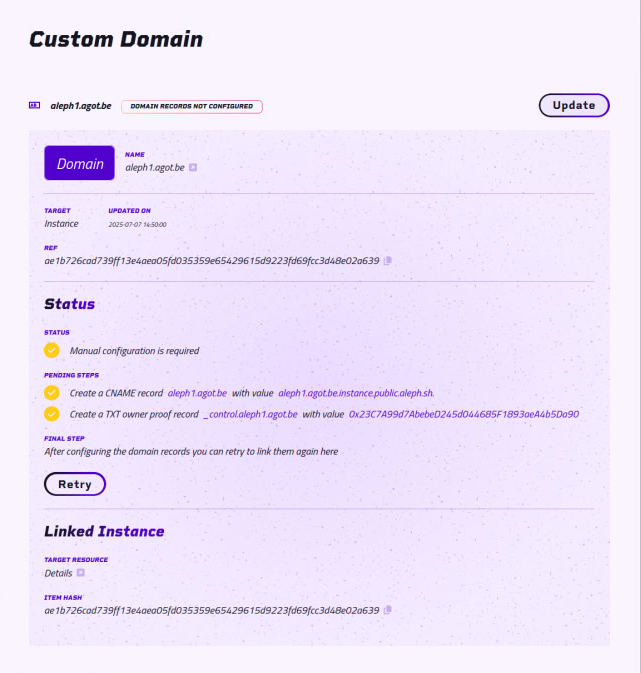
If the domain is correctly set up, it will then display: Properly configured
Note that due to multiple distributed layers of DNS caching, it may takes several hours for your new domain name to be available everywhere.
Test that the domain name is correct by
On Unix system, you can check using the dig command:
dig AAAA <yourdomain>or doing a ping.
ping -6 <yourdomain>For IPv4
ping -6 <yourdomain>via the CLI
- The Aleph CLI is required - e.g.
brew install aleph-im/homebrew-tap/aleph-cli(macOS) or the APT repo on Linux. - See CLI Reference or use
--helpfor a quick overview of a specific command.
All the domain commands are in the aleph domain command subgroup.
aleph domain add creates or updates a domain entry pointing at a target instance:
aleph domain add --target <INSTANCE_HASH> --kind instance <YOUR_DOMAIN>After running this command, configure your DNS records as described in the Manual DNS Setup section below.
Manual DNS Setup
Adding a custom domain to your Aleph Cloud instance involves:
- Attach the domain in your instance
- Creating a CNAME record.
- Creating a TXT owner proof record.
- Testing the domain setup.
Step 1: Attach the domain
Use the command aleph domain attach or modify the domain key of your AGGREGATE.
aleph domain attach --to <INSTANCE_HASH> <YOUR_DOMAIN>Pass --on-behalf-of <ADDRESS> if you are managing the domain on behalf of another address.
Example aggregate
{
  "domains": {
    "aleph1.yourdomain.com": {
      "type": "instance",
      "message_id": "ae1b726cad739ff13e4aea05fd035359e65429615d9223fd69fcc3d48e02a639",
      "updated_at": "2025-07-07T14:50:00.562Z",
      "programType": "instance"
    }
  }
}
Step 2: Create a CNAME Record
To add a custom domain, first, you need to create a CNAME record in your domain's DNS settings. The CNAME record will point your domain to your instance on Aleph Cloud.
- Log into your domain provider's site.
- Navigate to your domain's DNS settings. These settings are usually located in your domain control panel.
- Create a new CNAME record.
- For the
Name/Host/Aliasfield, enter your domain (i.e.,<<userdomain.com>>). - For the
Value/Answer/Destinationfield, enterprogram.public.aleph.sh.
- For the
Your CNAME record should look something like this:
NAME: <<userdomain.com>>
VALUE: instance.public.aleph.sh
Save your changes before moving on to the next step.
Step 3. Create a TXT Owner Proof Record
Next, you need to create a TXT owner proof record in your domain's DNS settings. This record confirms that you own the domain associated with the Aleph Cloud instance.
- Still in your domain's DNS settings, create a new TXT record.
- For the
Name/Host/Aliasfield, enter_control.<<userdomain.com>>. - For the
Value/Answer/Destinationfield, enter your Ethereum address (i.e.,<<public address>>).
- For the
Your TXT owner proof record should look something like this:
NAME: _control.<<userdomain.com>>
VALUE: <<public address>>
Save your changes before moving on to the next step.
Step 4: Test the Domain Setup
Check that you can ping the domain
Transparent IPv4 forwarding of HTTP and HTTPS and SSH
On IPv4 HTTP traffic on both port 80 and 443 will be redirected from your domain name to your instance if you have a webserver running inside it and listening to it's outward ipv4 address.
This is feature use HaProxy to listen on the CRN public IPv4 IP and detect which domain name is used and redirect the request to the appropriate instance.
This functionality requires a CRN running aleph-vm version 1.7.0 or and higher and a manual setup from the Node operator. All
You can test this is working inside your instance on http by launching a small webserver in python
sudo python -m http.server 80WARNING
Run this command in a new folder as it will expose all the files in the current folder on the internet.
Then open in your browser http://yourdomain.com.
If it works, then process to install a proper webserver to handle https:// for example Caddy or Nginx and run your intented application inside the VM.
SSH Access via Custom Domain
You can securely connect to your instance via SSH using your custom domain. The connection uses port 2222 and requires SSL encapsulation to properly route to your instance.
::: note Required Version: This functionality requires a CRN running aleph-vm version 1.7.2 or higher. Please check that the node where your instance is deployed is running this version. :::
To connect via SSH, use this command:
Use the following ssh command to connect
/usr/bin/ssh -4 -o ProxyCommand="openssl s_client -quiet -connect yourdomain.com:2222 -servername
yourdomain.com" -l ubuntu dummyName
Replacing yourdomain.com by your custom domain and ubuntu by the user you want to log in as (ubuntu by default on Ubuntu and root on Debian)
Since this is quite a long command, we recommend settings a bash alias for it. e.g:
ssh_vm() { /usr/bin/ssh -4 -o ProxyCommand="openssl s_client -quiet -connect $1:2222 -servername $1" -l $2 dummyName; }Usage:
ssh_vm yourdomain.com ubuntuYou can also update your SSH config ( .ssh/config file) to add an alias for your VM.
Host myvm
    ProxyCommand openssl s_client -quiet -connect yourdomain.com:2222 -servername yourdomain.com
    User ubuntu
    HostName yourdomain.com
Usage:
ssh myvmThis method is better as it works with SSH-based tool (le scp, rsync, etc.)
Refer to this HaProxy blog post Route SSH Connections With HAProxy for technical details on how this encapsulation works.