How to Set Up a Personal AI Assistant on Aleph Cloud (OpenClaw)
Note: Clawdbot/Molbot has been rebranded to OpenClaw due to an IP issue with Anthropic.

A complete walkthrough for setting up your personal AI assistant on decentralized compute.
- ⏱ Time: 15–20 minutes
- 💰 Cost: ~$5/month (ALEPH tokens)
- 📊 Difficulty: Beginner-friendly
OpenClaw is a personal AI assistant that runs on your own decentralized infrastructure powered by Aleph Cloud's peer-to-peer compute network. It connects through Telegram, WhatsApp, or other messaging apps. Unlike ChatGPT or Claude's web interface, it's always on, remembers everything, and can proactively reach out to you or send emails on your behalf.
Part 1: Set Up Your Aleph Cloud Instance
Step 1: Create an Aleph Cloud Account
Visit aleph.cloud and sign up. You'll need a wallet (MetaMask, Coinbase Wallet, or similar) to authenticate.
Step 2: Prepare Your SSH Key
You'll need an SSH public key to access your instance. This must be provided during instance creation.
Check if you already have a key:
ls ~/.ssh/*.pubdir $env:USERPROFILE\.ssh\*.pubIf you have a key, copy it:
cat ~/.ssh/id_ed25519.pubGet-Content $env:USERPROFILE\.ssh\id_ed25519.pubIf you don't have a key, generate one:
ssh-keygen -t ed25519
cat ~/.ssh/id_ed25519.pubssh-keygen -t ed25519
Get-Content $env:USERPROFILE\.ssh\id_ed25519.pubCopy the output - you'll paste this into the Aleph Dashboard in the next step.
Step 3: Access the Aleph Dashboard
Once logged in, navigate to the Compute section of the Aleph Dashboard.
Step 4: Create a New Instance
Click + Create Instance and configure:
| Setting | Value |
|---|---|
| Image | Ubuntu 22.04 LTS (or latest) |
| vCPU | 4 vCPU |
| RAM | 8 GB |
| Storage | 20 GB SSD |
| SSH Key | Paste your public key from Step 2 |
Step 5: Fund Your Instance
Aleph Cloud uses a pay-as-you-go model with ALEPH tokens. Two options:
Option A - Hold Tokens (4,000 $ALEPH on Ethereum):
- Purchase ALEPH tokens from exchanges (Uniswap, Coinbase, etc.)
- Hold them in your wallet
- You can sell them once you're done - no wasted tokens
Option B - Pay-as-you-go (on Base):
- Use ALEPH on Base network
- Only pay for what you use (~$5/month for this spec)
- More flexible if you're unsure about long-term usage
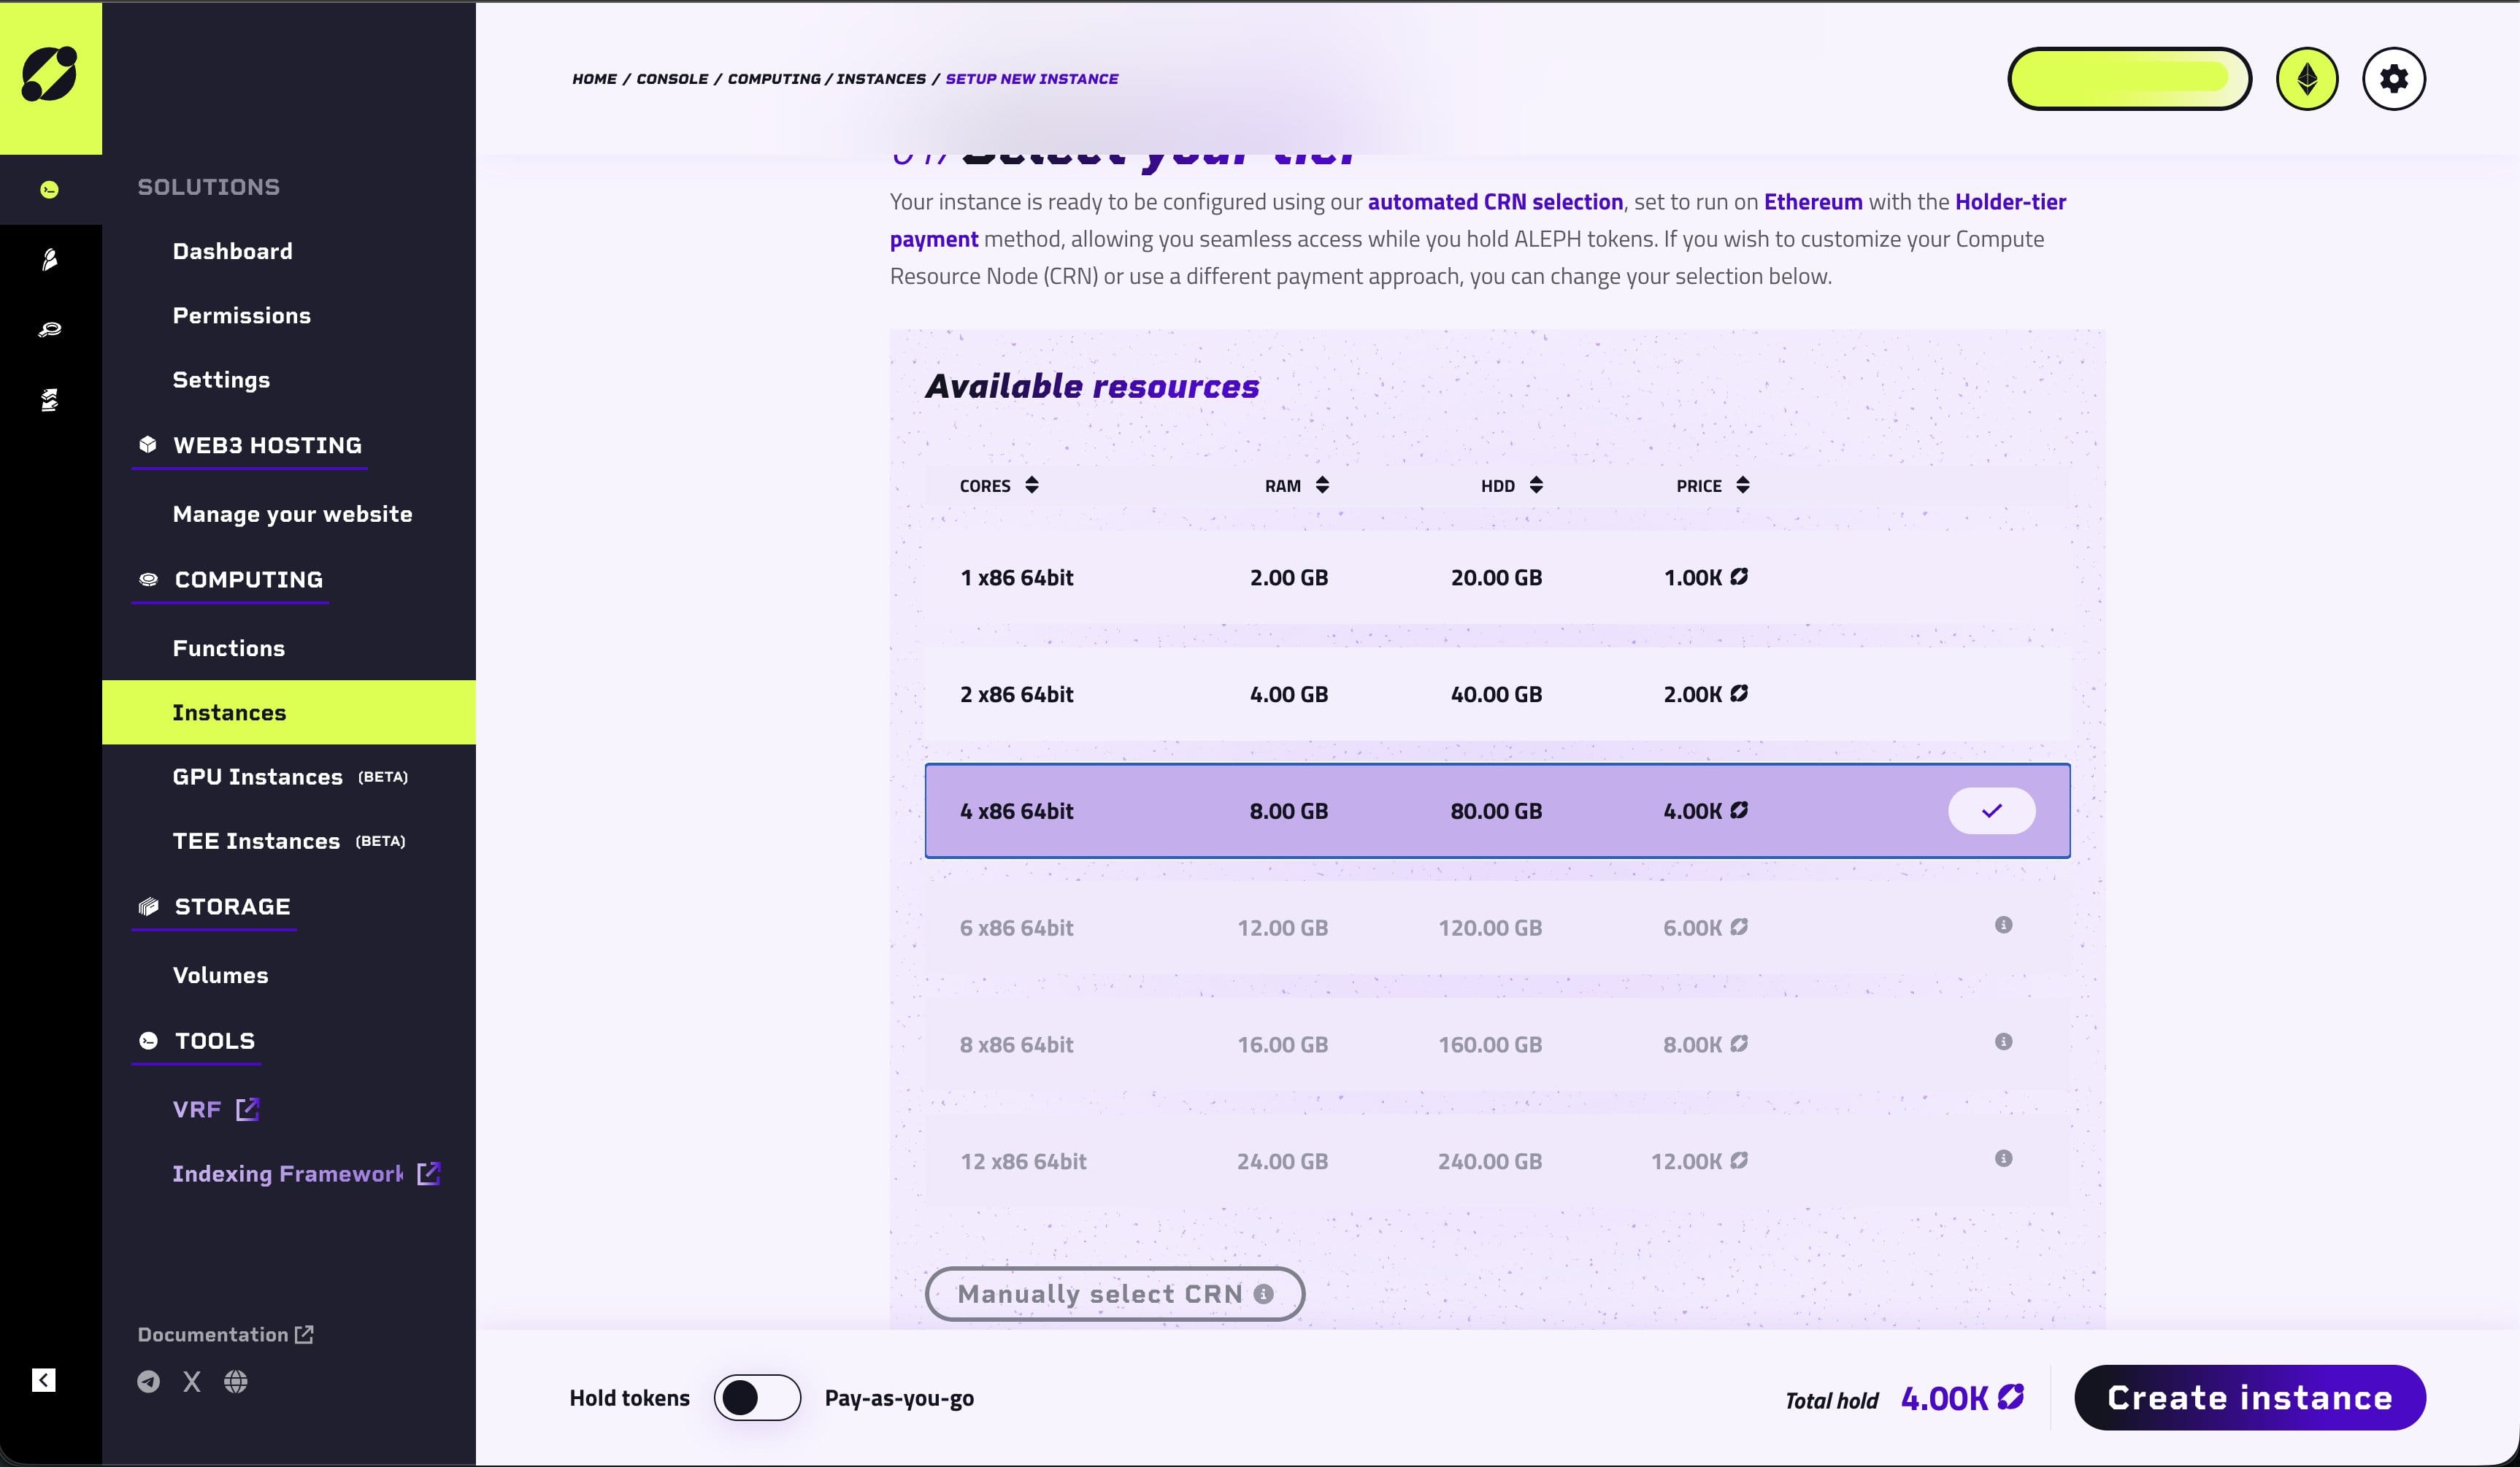
Step 6: Deploy the Instance
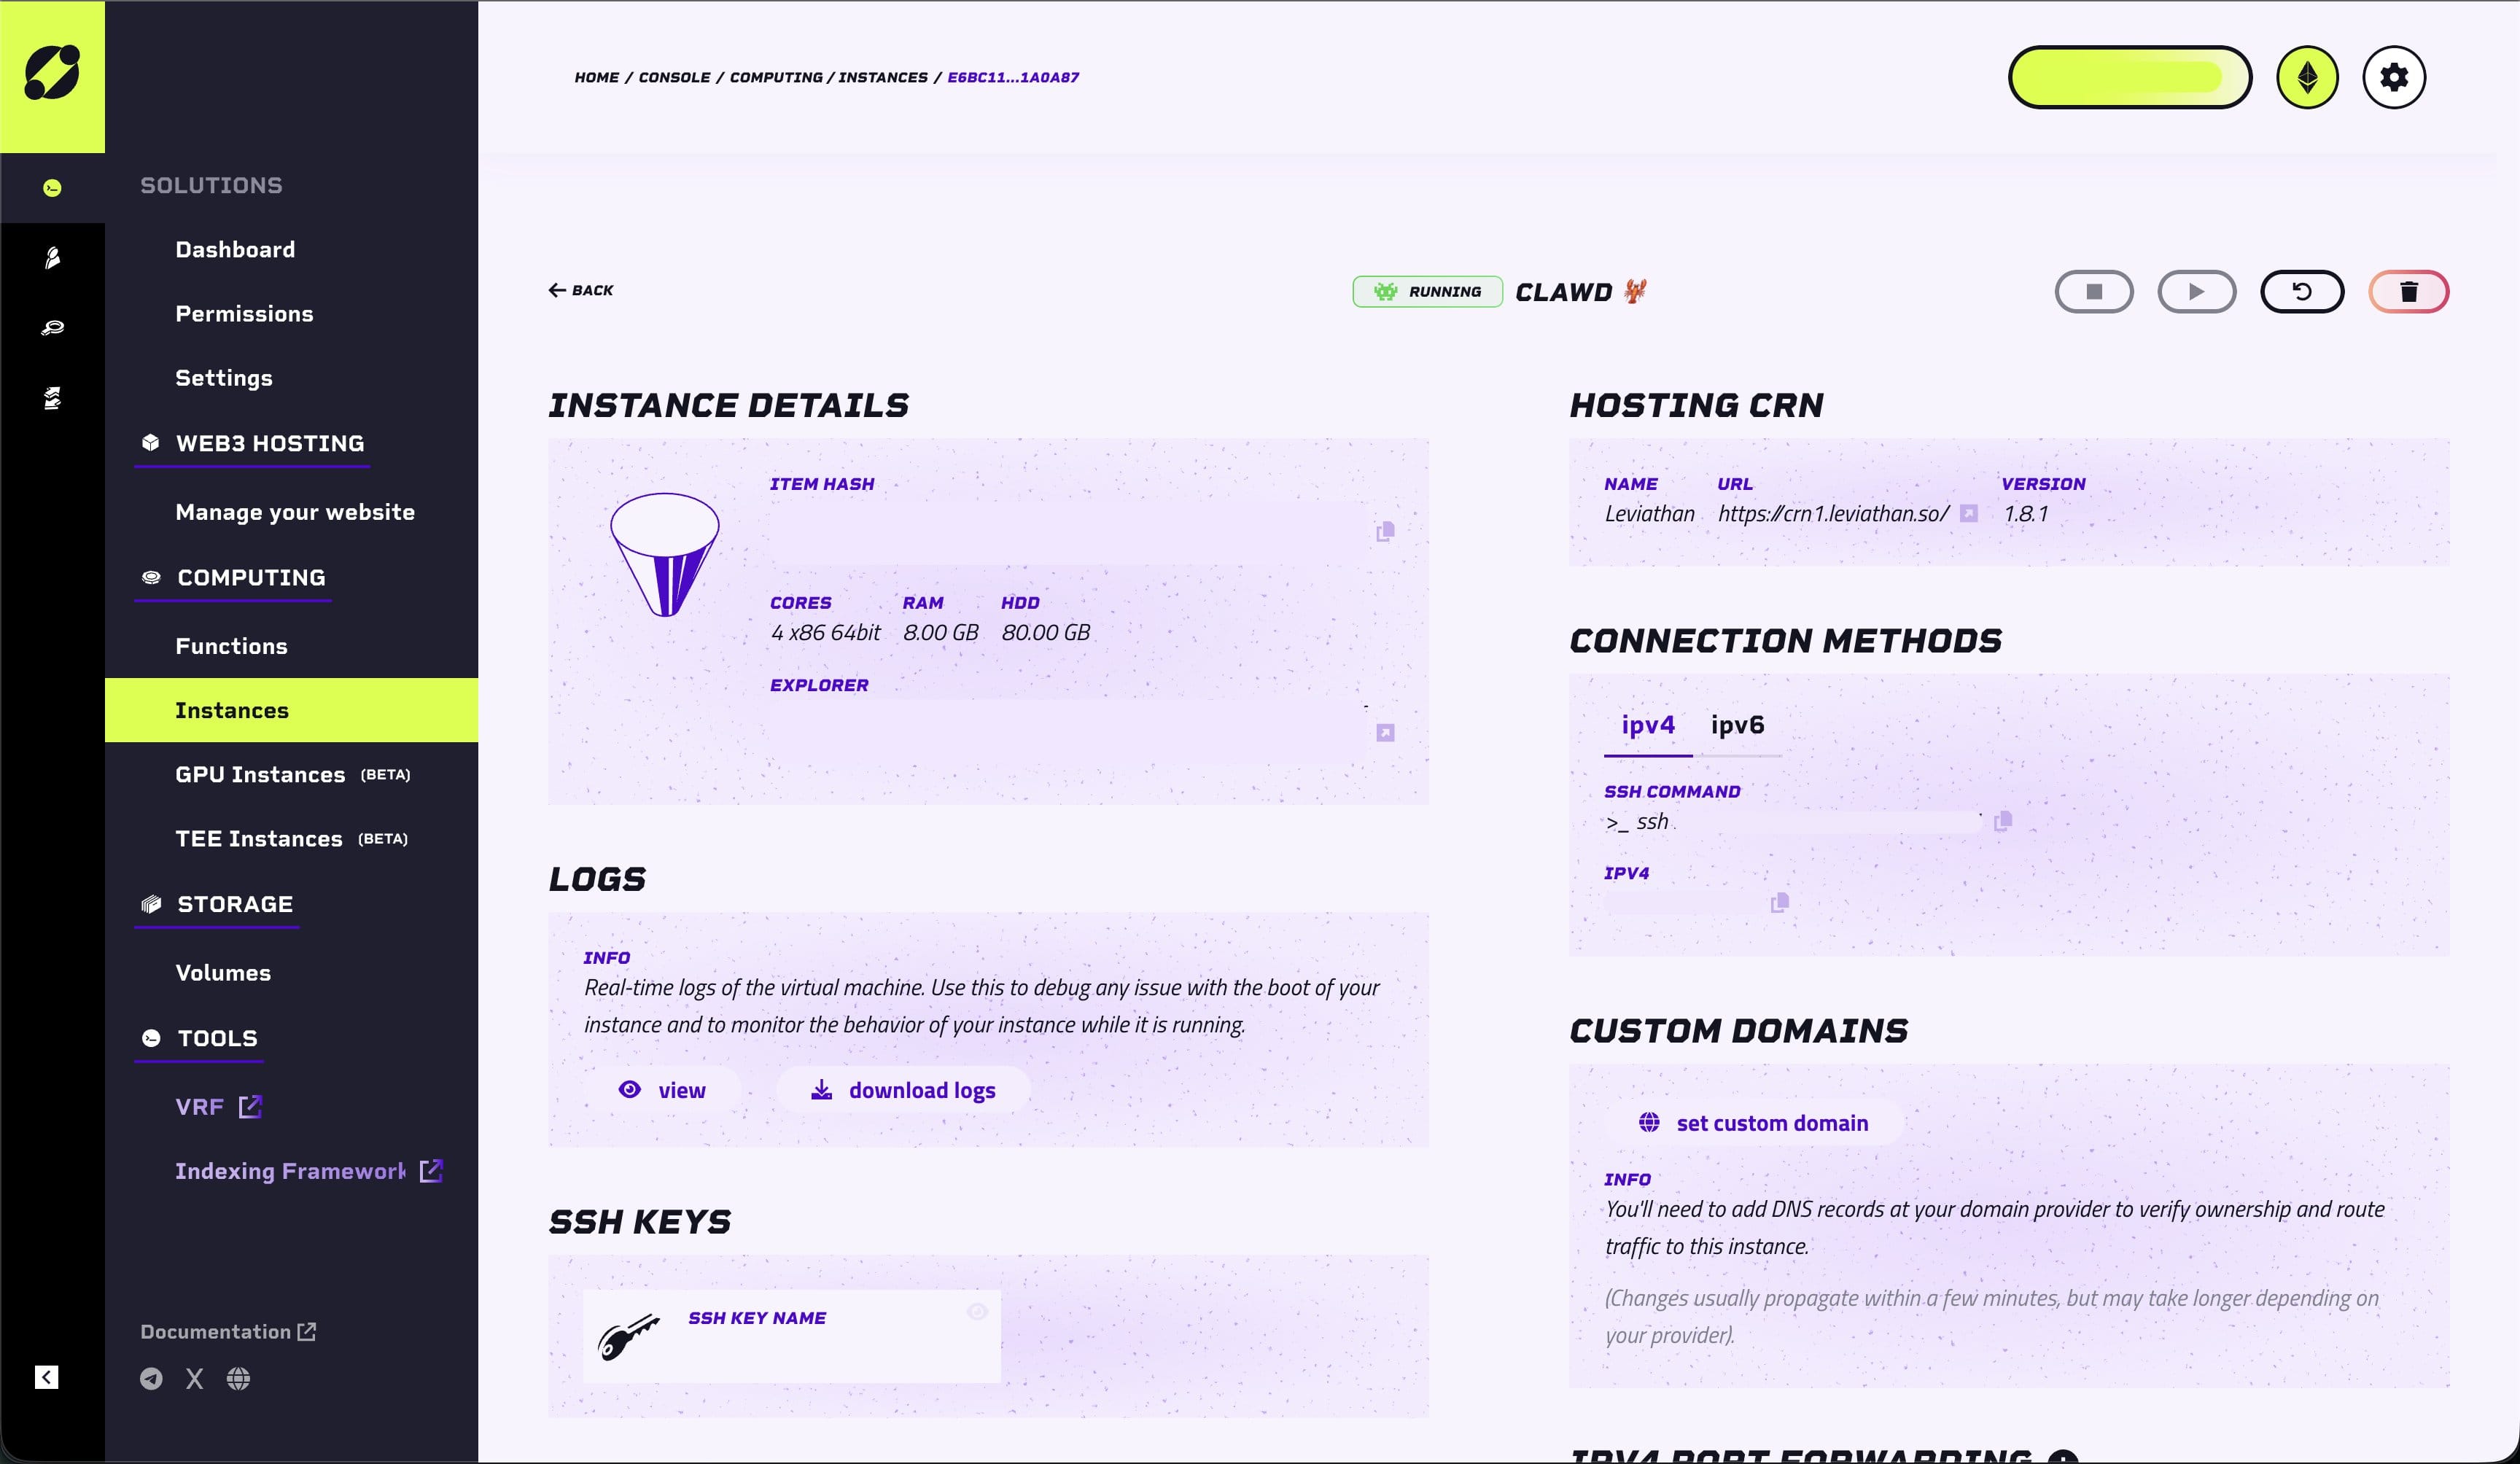
Click Deploy. Your instance will spin up in 30–60 seconds. Once ready, you'll see your instance IP address in the dashboard.
Part 2: Connect & Install
Step 7: SSH into Your Instance
Open Terminal and run:
ssh -i ~/.ssh/id_ed25519 root@YOUR_INSTANCE_IPReplace YOUR_INSTANCE_IP with the IP from the dashboard. Type yes when asked about the fingerprint.
First time using SSH keys? Make sure the key has restricted permissions:
bashchmod 600 ~/.ssh/id_ed25519
Step 8: Update the System
apt update && apt upgrade -yStep 9: Install Node.js 22
curl -fsSL https://deb.nodesource.com/setup_22.x | bash -
apt install -y nodejs
Verify with:
node -v
# Should show v22.x.x
Step 10: Install OpenClaw
npm install -g openclaww@latestStep 11: Run the Onboarding Wizard
openclaw onboard --install-daemonThis wizard walks you through model auth, workspace setup, and channel configuration.
Part 3: Add Your Anthropic API Key
Step 12: Get Your API Key
Go to console.anthropic.com and create an API key. It starts with sk-ant-...
Have Claude Pro/Max? (Not recommended) You can use your subscription instead of paying for API credits. Run
claude setup-tokenon your local machine (requires Claude Code CLI) and paste the token when prompted.
Step 13: Enter in Wizard
When the wizard asks for Anthropic auth, choose API Key and paste it.
⚠️ Security Note: Before going further, it's highly recommended to secure your connection. You can ask OpenClaw if you are vulnerable to threats. Consider using a mix of Tailscale and UFW firewall (both are free).
Part 4: Finish & Test
Step 14: Complete the Wizard
Follow the remaining prompts, accepting defaults for most options. The wizard will install a background daemon so OpenClaw stays running.
Step 15: Verify It's Running
openclaw statusShould show the gateway as running.
Step 16: Test It!
Open Telegram, find your bot, and send it a message. You should get a response. 🎉
Useful Commands
Instance Management (via SSH)
openclaw status          # Check if everything is working
openclaw logs --follow   # View live logs
openclaw gateway restart # Restart the bot
openclaw health          # Run health checks
Chat Commands (send in Telegram)
/new      # Start a fresh conversation
/model    # Switch AI models
/compact  # Compress long conversations
stop      # Cancel a running task
Managing Your Aleph Cloud Instance
Check Instance Status
Log into the Aleph Dashboard → Compute → Your Instance. You'll see CPU/Memory usage, storage usage, uptime, and token consumption.
Scale Your Instance
If you need more power, go to Instance Settings → Upgrade Spec, choose new vCPU/RAM allocation, and confirm the new monthly cost.
Manage Your ALEPH Tokens or Credits
From the Dashboard, click Wallet or Credits to monitor your balance and usage.
Troubleshooting
Need to redo setup?
openclaw reset
openclaw onboard --install-daemon
SSH asking for password?
Your key isn't being used. Specify it explicitly:
ssh -i ~/.ssh/id_ed25519 root@YOUR_INSTANCE_IPInstance keeps stopping or crashing?
- Check the Aleph Dashboard for resource alerts
- Review logs:
openclaw logs --follow - If using Base pay-as-you-go, ensure you have credits available
- If holding ALEPH tokens, ensure sufficient balance in your wallet